

SolidWorks 201: Surfacing And Collaboration Techniques
/Download all 42 training videos (in MP4 format) plus extra files and resources for a single, one-time fee.
- No memberships.
- No recurring payments.
- Download and keep forever.
- View on any device, any time.
- No ads. No spam. No bloatware.


Hold onto your nunchacku! In this SolidWorks 201 Training Series industrial designer Adam O’Hern elevates SolidWorks ninjas to even more lethal status with more real-world design techniques inspired by real-world processes. Whether you’re an aspiring design rockstar or an above-average Maker, this course empowers product designers of all kinds to use SolidWorks as a powerful creative tool.
Ooey-Gooey Product Design Goodness!
While there are many different ways of approaching a design problem in SolidWorks, this series focuses on ‘throwing your ideas out there’ in real-time with the goal of building up multiple iterations that can be easily modified, organized, and shared. Additionally, we’ve included an extensive amount of content focusing on easily adjusting design details based on engineering constraints…such as “how will these batteries fit” or “will my buttons line up with the circuit board?”
Contents
Part 1: Getting Started
Here we'll cover some common myths about the 'linear' design process and how things are more likely to happen in 'the real world'. Particularly, we'll cover why it's better to design and save our assets in such a way that it's easy to make changes on the fly.
- Overview I (Using the Series) (02:28)
- Overview II (The Design Process) (04:48)

Part 2: Understanding a Master Assembly
In this section we'll lay the groundwork of what will be our 'master file'. When we have a master file setup properly we are able to work iteratively and save only the juiciest bits for our final model rather than redesigning each iteration.
- Setup Sprint I (03:47)
- Iterations (04:36)
- Organization & Apperances (04:09)
- Setting Up Master Assembly I (03:38)
- Setting Up Master Assembly II (03:31)
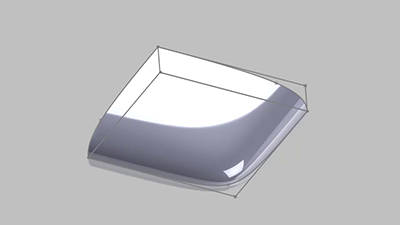
Part 3: Surfacing
Ah, surfacing how we love you so. In this section we'll go over a handful of ways to develop the overall form of your design from a variety of different surfacing methods.
- Pillowed Surface (Conic) (03:35)
- Pillowed Surface (Spline Method) (05:50)
- Pillowed Surface (Loft) (02:13)
- Pillowed Surface (Boundary) (05:30)
- Pillowed Surface (Finish) (04:09)
- Engineering Layout (05:27)
- Dimensional Adjustments (04:08)

Part 4: Developing the Form
In this section we're going to work quickly with the 'volume forms' we developed in the last section and break them into separate manufacturable parts. We might even sneak in a sip of root beer.
- Setup Sprint III (05:50)
- Design Iteration I (Split) (05:03)
- Design Iteration I (Swept Cut) (05:39)
- Design Iteration I (Profile Cut) (02:50)
- Design Iteration I (Cut Buttons) (04:01)
- Design Iteration II (Setup) (11:02)
- Design Iteration II (Scallop) (04:20)
- Setup an Iteration Grid (04:17)

Part 5: Internal Components
Over in engineering, we've just received a courier message via spitball that's letting us know to update the location of something on our design to better accommodate the batteries. After we reply with a Nerf dart, we'll make the final adjustments needed to ensure that our housing is properly containing the important bits inside.
- Engineering Setup (03:39)
- Screw Boss Setup (Setup) (05:21)
- Screw Boss Pattern (02:47)
- Battery Housing (04:28)

Part 6: Consolidating Files
Now that we've established that our master design is our final iteration, we can start shedding some unnecessary weight from our files. In this section, we'll go over cleaning up our work that we've completed thus far to make going into the next design phase easier to manage.
- Setup Spring IV (03:03)
- Down Select (03:10)
- Add Sketches to Master (05:07)

Part 7: Working with Graphic Design
Over in the Graphic Design department, we've just received word that our button graphics have been approved and ready to be placed on our housing design. In this section we'll cover how to export vector graphics from Illustrator and how to go about placing them accurately on your SolidWorks model.
- Create PDF Drawing (04:10)
- Illustrator Export (05:23)
- Import Artwork (05:05)
- Mirror Block (03:48)

Part 8: The Final Working Assembly
Now that our housing is feeling snug and looking pretty, we're going to make a few more adjustments to make sure that we are able to move onto the last phase of our design process.
- Battery Door (05:54)
- Bottom Housing I (05:21)
- Bottom Housing II (05:54)
- Adjustments (05:45)
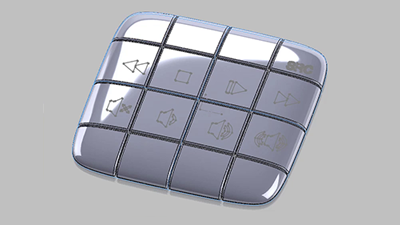
Part 9: Creating Buttons
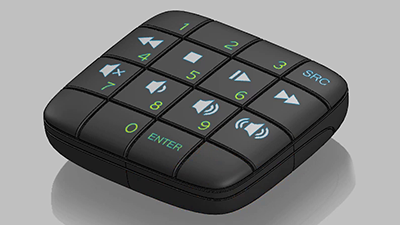
You can't have a remote control without buttons! Thankfully, we've saved the best for last and in this section we'll cover the groundwork for finalizing the buttons on our remote.
- Buttons (04:07)
- Pad Prints (03:23)

Part 10: Finishing Touches
Now that the bulk of all of our work is done, it's time to put our signature on it. In our last section of the series, we'll double-check that everything is looking good and sign our little remote with our own logo. Fancy Schmancy.
- Back Logo I (03:44)
- Back Logo II (04:05)
- Finishing Touches (07:01)
Topics
Overall
Overview of Collaborating
File Management
Designing Iteratively
Build First, Refine Later
Setting Up Sprints
Folder Management
Master Assemblies
Saving Externally
Surfaces
Conic
Spline Method
Loft
Boundary
Finish
Engineering
Importing Components
Dimensional Adjustments
Master Files
Designing Features
Iteration Grids
Splitting a Part
Swept/Profile Cuts
Scallops
Fasteners
Component Doors
Interactive Features
Button Design
Slicing
Button Fillets
Working with Graphics
AI Export and SW Import
Placing Graphics
Adjusting Graphics
Appearances
Material Settings
Transparent Views
Color-Code Iterations